CNET News.com reports: "Microsoft has confirmed that all versions of Vista will be shipped on a single DVD, in a feature called Windows Anytime Upgrade. ... The idea, said a company representative, is to let customers more easily and directly upgrade to a higher edition of Windows Vista from within their current edition. Vista is scheduled to reach consumers in January."
Personally I think this is a great idea. I don't know how many times I had to search for the right CD (i.e. Windows XP: Home, Professional, Media Center, Tablet, x64) when I needed to build a system, add a new component, etc.
Plus the idea of 'Windows Anytime Upgrade' will definitely be a welcome feature. For example, lets say you just bought that new PC, and it comes with Windows Vista Home edition, but you really wanted Ultimate edition. You don't have to buy a new copy of the OS (which can be expensive), you just have to pay for the upgrade price (which is cheaper then a full copy).
Friday, September 22, 2006

Thursday, September 21, 2006
Windows XP: Windows File Systems
Windows XP supports several different file system, from FAT16 which was used by MS-DOS to NTFS which was first available as part of Windows NT. FAT16 only supports the most basic features, such as short file names (i.e.: FILENAME.EXT), and a maximum file partition size of 2GB. FAT32 was Microsoft's next file system to address the need for larger hard drive support, and added support for longer file names (255 characters).
Then when Windows NT (I believe it was version 3.51) was released, NTFS was made available. NTFS is the most secure, feature rich, and fault tolerant file system Microsoft has ever created. It can support a partition size up 2 terabytes, and also supports long file names.
Then when Windows NT (I believe it was version 3.51) was released, NTFS was made available. NTFS is the most secure, feature rich, and fault tolerant file system Microsoft has ever created. It can support a partition size up 2 terabytes, and also supports long file names.
- FAT16: Used primarily with Windows 3.1 and earlier versions of MS-DOS. This file system type is also used by most USB flash drives for storing files. FAT16 can not read or write files on FAT32 and NTFS formatted partition.
- Maximum
- Partition size: 2GB
- File name length: 8.3 characters (i.e.: FILENAME.EXT)
- FAT32: Used by Windows 95, 98, and ME primarily. FAT32 can not read or write files in an NTFS formatted partition, but is backwards compatible with FAT16.
- Maximum
- Partition size: 32GB
- File name length: 255 characters
- NTFS: Used by the NT based versions of Windows, including NT, 2000, XP, and 2003.
- Maximum
- Partition size: 2TB
- File name length: 255 characters
- additional features: file/directory security, fault tolerant, disk quotas, encryption, and more.
Wednesday, September 20, 2006
Windows XP: Setting the User Password
There are times that you need to change your password or the password of another user on your computer. If your one of the administrators of the system, you can change other people's password on the computer for them.
To change a users password:
To change a users password:
- Open the Control Panel folder from under the Start menu
- Double-click on the 'User Accounts' control panel.
- Click on the account you want to change.
- Click the 'Change my password' link. If the user never had a password you will need to click the 'Create a password' link.
- If its your account you will be prompted to enter your current password. If its someone else's account you won't see this field.
- Enter the new password you want to assign to that user, then re-type the new password you just entered in the confirmation field.
- There is an option at the bottom of the window to leave a 'password hint' that can help the person remember their password just in case they forget it.
- Press the 'Change Password' button when done.
Tuesday, September 19, 2006
Windows XP: Using the 'My Pictures Slideshow' Screen Saver
Did you know that you can use your photos to create a custom screen saver? Windows XP includes a screen saver that can randomly display your digital photos that you have taken that are stored in the 'My Pictures' folder.
To set up a 'My Pictures Slideshow' screen saver, follow the instructions below:
To set up a 'My Pictures Slideshow' screen saver, follow the instructions below:
- Right-click on the desktop, and then click Properties.
- In the Display Properties dialog box, click the Screen Saver tab.
- Click the Screen saver drop-down list, and select 'My Pictures Slideshow'.
- Note: You can press the Settings button to set different options, such as the delay, how big the pictures are displayed, etc.
- Press the OK button.
Monday, September 18, 2006
Windows XP: Web Image as your Desktop Background
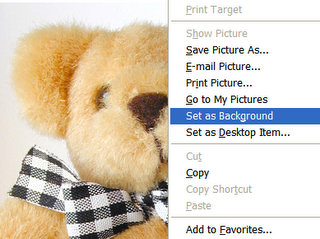
Did you know that you can use images from the web as your desktop background? If you're using Internet Explorer, and you find a picture that you want to use as your desktop background. All you have to do is right-click on the picture, and then select 'Set as Background' in the menu.
If you minimize all the windows, you should now see the image that you selected as your desktop background. For the best results, use the largest image that you can find that comes close to matching the resolution of your monitor.
If you minimize all the windows, you should now see the image that you selected as your desktop background. For the best results, use the largest image that you can find that comes close to matching the resolution of your monitor.

Friday, September 15, 2006
Security: Upgrade Your Firefox (v1.5.0.7 is now available)
This has been a crazy week of patching applications and the OS. First there was Microsoft's Patch Tuesday, then there was the Apple Quicktime update, and now Firefox. We are now in the age of zero-day exploits, so you need to move fast to protect yourself.
If you're using Firefox 1.5.x (and you have it automatically set to check for updates), then you should know by now that Firefox v1.5.0.7 has been released. If you have not upgraded already, then you should do it soon.
Here is a list of the fixes that are in this release. There are some features fixes, but most of them are security related.
If you're using Firefox 1.5.x (and you have it automatically set to check for updates), then you should know by now that Firefox v1.5.0.7 has been released. If you have not upgraded already, then you should do it soon.
Here is a list of the fixes that are in this release. There are some features fixes, but most of them are security related.
Thursday, September 14, 2006
Article: Yahoo Messenger offers free group conference calls
Yahoo! News reports: "Yahoo Inc. is offering free group conference calling services from Vapps Inc. to the roughly 80 million users of Yahoo's instant-message and Web telephone-calling service, ... The service, called ConFreeCall, will be available for download through Yahoo Messenger with Voice service, allowing friends or families to hold free conference calls to complement Yahoo's existing text, voice and photo-sharing services."
After reading this article, you will be left asking yourself some questions (well at least I did)?
After reading this article, you will be left asking yourself some questions (well at least I did)?
- Does the service require Yahoo! Messenger with Voice service?
- Yes, only if you want to take advantage of the plug-in. Otherwise this service is also directly available from Vapps at http://www.confreecall.com, and doesn't require the plug-in .
- Does everyone in the conference need a computer to use this service, or can you use a regular phone participate?
- No, but they will be required to call a non-800 phone number, so toll charges can apply. Although if you already have a VoIP service like Vonage (or whoever else you may use) with unlimited calling in the US, or a cell phone that doesn't charge for long distance calls and you have the available airtime then your in good shape.
Wednesday, September 13, 2006
Security: Update QuickTime Now!
The QuickTime media player has multiple security flaws that is putting your Windows computer (and if you have a Mac) at risk for malicious attack according to Apple. Hackers can create maliciously crafted movie and image files that could be used to execute harmful code on vulnerable machines by utilizing a buffer overflow error.
QuickTime 7.1.3 has been released as a high-priority update. This update fixes all the recent known vulnerabilities. If you have not already updated your computer, I would highly recommend that you download it and update it now.
Bonus Tip: If you select the 'QuickTime 7.1.3 for Windows 2000/XP' option on the download page, you can get Quicktime without iTunes.
QuickTime 7.1.3 has been released as a high-priority update. This update fixes all the recent known vulnerabilities. If you have not already updated your computer, I would highly recommend that you download it and update it now.
Bonus Tip: If you select the 'QuickTime 7.1.3 for Windows 2000/XP' option on the download page, you can get Quicktime without iTunes.
Tuesday, September 12, 2006
Security: Another Microsoft Patch Tuesday
We just had another Patch Tuesday, which means that Microsoft just published another round of security fixes for Windows and its applications. This date is meant to be a predictable date (the second Tuesday of the month) so that companies only have to patch their computers once a month. If you have never been apart of a corporate IT security update before this regular patch cycle, when a new critical update was released then all the fun would begin (think chickens with their heads cut off).
For the average user, if you have Automatic Updates enabled your computer will download these updates automatically for you in the background. Then when you shutdown these patches will be installed, or if you leave your computer on overnight it will automatically be installed and your system rebooted. Then any unsaved work will be lost...
To keep your computer updated, if you don't have 'Automatic Updates' turned on I would recommend that you enable it as soon as possible. Also if you have enabled this feature, and you leave your computer on overnight I would save all your work before you leave it for the day.
To enable automatic updates:
Note: For the latest Microsoft Security Bulletins, check out this site.
For the average user, if you have Automatic Updates enabled your computer will download these updates automatically for you in the background. Then when you shutdown these patches will be installed, or if you leave your computer on overnight it will automatically be installed and your system rebooted. Then any unsaved work will be lost...
To keep your computer updated, if you don't have 'Automatic Updates' turned on I would recommend that you enable it as soon as possible. Also if you have enabled this feature, and you leave your computer on overnight I would save all your work before you leave it for the day.
To enable automatic updates:
- From the Start menu, select the Control Panel folder.
- Double-click the System applet in the control panel folder.
- Click the 'Automatic Updates' tab.
- Check the 'Automatic (recommended)' option. (optional: also from your if you don't like this feature, you can set it to download but not install the update, just notify you, or disable this feature altogether [not recommended])
- Press the OK button when done.
Note: For the latest Microsoft Security Bulletins, check out this site.
Monday, September 11, 2006
Networking: Setting up Wireless Ad-Hoc Network
Did you know two or more Wi-Fi enable computers can talk to each other over a wireless ad-hoc network without a Wireless Access Point (WAP)? You can share resources, like :printers, files, and even an Internet connection.
The great news is most computers and devices, already support the peer-to-peer wireless ad-hoc networking. This means that no extra software is required to be installed on your computer.
To setup a wireless ad-hoc network, you need a computer that has a 802.11B or 802.11G wireless card. Most modern laptops come with this hardware by default. On the computer that has the resources you want to share, you need to setup ad-hoc networking, then the clients only need to connect to it.
The great news is most computers and devices, already support the peer-to-peer wireless ad-hoc networking. This means that no extra software is required to be installed on your computer.
To setup a wireless ad-hoc network, you need a computer that has a 802.11B or 802.11G wireless card. Most modern laptops come with this hardware by default. On the computer that has the resources you want to share, you need to setup ad-hoc networking, then the clients only need to connect to it.
- Double-click the Wireless Network Connection icon in the notification area (bottom right of your screen).
- Press the Properties button, then click the 'Wireless Networks' tab.
- Press the Add button, you should now be on the Association tab.
- Type a name for your network in the SSID box (like: Bob's computer).
- Check 'This is a computer-to-computer (ad hoc) network; wireless access points are not used.' checkbox (look at the bottom of the screen).
- If you're not going using data encryption to protect the traffic on your network, choose Disabled from the 'Data encryption' drop-down menu.
- Press the OK buttons, and your done.
Friday, September 08, 2006
Windows XP: Windows Registry Editor (Advanced)
Warning: Modify the registry at your own risk. By making an incorrect change to the registy you can prevent your applications and/or the operating system from working correctly.
The Registry is a very critical part of the Windows operating system (OS). Its basically a database that contains all the configuration settings for the OS and its applications. By modifying it, you can customize the OS to work the way you want by turning on or off certain features.
Note: Before modifying the registry always make a backup of it. You can do this with the Backup utility that comes with Windows. All you have to do use 'System State data' option. To backup individual keys you can use the Registry Editor's 'Export...' command under the File menu. For more information, see the MSKB 322756.
Modifying the Registry
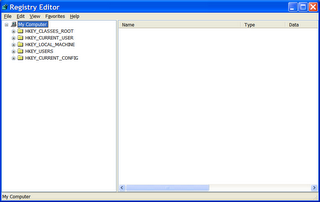
To modify the registry, you need to use the Windows Registry Editor. This tool is used for reading and writing data to this system area. The Registry Editor displays registry entries in a hierarchical tree structure, similar to the Windows Explorer metaphor for displaying files and folders.
Each node of the registry structure is called a 'key' (similar to a folder), and each key generally holds one or more different settings called 'values'. Each value can contain information stored in one of a few different data types. Below is a list of the registry data types:
Registry File Information
For thoses people who like to know everything, below is a list of files that are used for storing the differnent registry hives (i.e.: a group of keys, subkeys, and values). These files are stored in the %SystemRoot%\System32\Config folder.
Note: The HKEY_CURRENT_USER (i.e.: Ntuser.dat, Ntuser.dat.log, Ntuser.bak) hive is stored in the %UserProfile% folder.
The Registry is a very critical part of the Windows operating system (OS). Its basically a database that contains all the configuration settings for the OS and its applications. By modifying it, you can customize the OS to work the way you want by turning on or off certain features.
Note: Before modifying the registry always make a backup of it. You can do this with the Backup utility that comes with Windows. All you have to do use 'System State data' option. To backup individual keys you can use the Registry Editor's 'Export...' command under the File menu. For more information, see the MSKB 322756.
Modifying the Registry
To modify the registry, you need to use the Windows Registry Editor. This tool is used for reading and writing data to this system area. The Registry Editor displays registry entries in a hierarchical tree structure, similar to the Windows Explorer metaphor for displaying files and folders.
Each node of the registry structure is called a 'key' (similar to a folder), and each key generally holds one or more different settings called 'values'. Each value can contain information stored in one of a few different data types. Below is a list of the registry data types:
- Binary (REG_BINARY): Holds binary data displayed in hexadecimal format.
- DWord (REG_DWORD): Data represented by a number that is 4 bytes long.
- Expandable String (REG_EXPAND_SZ): A variable-length data string.
- Multi-String (REG_MULTI_SZ): A list of multiple string values.
- String (REG_SZ): Holds a fixed length string.
- HKEY_CLASSES_ROOT: stores information about the different file types (such as .MP3, .BMP, .TXT, etc...).
- HKEY_CURRENT_USER: stores settings from the HKEY_USERS key which contains information about the current logged in user.
- HKEY_LOCAL_MACHINE: stores global system setting, if you make a change here it effects all users..
- HKEY_USERS: stores information about all the system's user accounts.
- HKEY_CURRENT_CONFIG: contains a copy of the information from all the other root keys that in referent to the current running sessions.
- From the Start menu, select Run..., type "regedit" and press the OK button.
- In the left pane, navigate to the registry key or area you want to modify. You do this by opening each folder and drilling down deeper into the registry structure.
- From here you can create, modify or delete a registry key.
- To create it: right-click a registry key, and select New > Key.
- To rename it: right-click it, and select Rename. Give it a new name, and then press the Enter key.
- To delete it: right-click it, and select Delete.
- After you find the registry key you're looking for, in the right pane you can create, delete, or modify the registry value.
- To create it: right-click a registry key, and select New, then select a value type (i.e.: DWord, String, Binary, etc.). Give the value a name, then press the Enter key. Double-click the value, enter the data, and then press the OK button.
- To modify it: double-click on it, and enter a new data value.
- To delete it: right-click it, and select Delete.
- Press OK button, and close the Registry Editor.

Registry File Information
For thoses people who like to know everything, below is a list of files that are used for storing the differnent registry hives (i.e.: a group of keys, subkeys, and values). These files are stored in the %SystemRoot%\System32\Config folder.
Note: The HKEY_CURRENT_USER (i.e.: Ntuser.dat, Ntuser.dat.log, Ntuser.bak) hive is stored in the %UserProfile% folder.
| Registry hive | Supporting files |
| HKEY_LOCAL_MACHINE\SAM | Sam, Sam.Log, Sam.bak |
| HKEY_LOCAL_MACHINE\Security | Security, Security.log, Security.bak |
| HKEY_LOCAL_MACHINE\Software | Software, Software.log, Software.bak |
| HKEY_LOCAL_MACHINE\System | System, System.log, System.bak |
| HKEY_CURRENT_CONFIG | System, System.log, System.bak, Ntuser.dat, Ntuser.dat.log, Ntuser.bak |
| HKEY_USERS\DEFAULT | Default, Default.log, Default.bak |
Thursday, September 07, 2006
Software: Windows Genuine Advantage Diagnostic Tool
Are you getting and error message ("0x80070005") when you're trying to run Windows Update because the Windows Genuine Advantage (WGA) validation tool fails to install. This problem is occurring because the appropriate permissions were not detected.
Microsoft has created a tool called 'MGADiag.exe' (formerly known as 'WGADiag2.exe') that can fix this problem. All you have to do to correct the is download the MGADiag.exe tool, and then run it.
Microsoft has created a tool called 'MGADiag.exe' (formerly known as 'WGADiag2.exe') that can fix this problem. All you have to do to correct the is download the MGADiag.exe tool, and then run it.
Wednesday, September 06, 2006
Software: Yahoo Widgets Engine
The Yahoo Widget Engine (formerly known as Konfabulator) lets you run all sorts of fun and useful mini-apps known as Widgets anywhere on your desktop. There are thousands of widgets already available from Yahoo!, and if you don't like those you can also build your own.
Some of the more useful Widgets that are available are: clocks, calculators, calendars, day planners, etc. There are also several useless widgets that are really fun too. Check out the gallery to see what is available.
Some of the more useful Widgets that are available are: clocks, calculators, calendars, day planners, etc. There are also several useless widgets that are really fun too. Check out the gallery to see what is available.
Tuesday, September 05, 2006
Windows XP: Edit Local Computer Settings (GPEDIT)
Note: This tip only works with Windows XP Professional Edition
Warning: This is an advanced tip, and should only be used by someone who understands what they're modifying. If you're not careful, you can disable your operating system and/or applications by modifying the wrong setting(s). Use this tip at your own risk.
Most changes to your system configuration can be made through the control panel folder. Although there are some advanced changes to your computer settings that are only available via the Group Policy or Windows Registry editor.
In this tip I am going to cover the basics of the Group Policy editor. To access this MMC (Microsoft Management Console), from the Start menu select the Run... command. Then type "GPEDIT.MSC" and press the OK button.
The policies are divided into two groups, Computer Configuration settings and User Configuration settings. The Computer configuration options change the way Windows operates. The User configuration options change the way users can interact with the operating system. Its important to note that when you modify any of these settings the changes can effect all users on your computer.
As I warned you earlier, explore these configuration options with caution. I would suggest making one change at a time then testing it, I would also note somewhere any changes that I made. Most configuration changes should take place right away, but some may require a reboot.
Warning: This is an advanced tip, and should only be used by someone who understands what they're modifying. If you're not careful, you can disable your operating system and/or applications by modifying the wrong setting(s). Use this tip at your own risk.
Most changes to your system configuration can be made through the control panel folder. Although there are some advanced changes to your computer settings that are only available via the Group Policy or Windows Registry editor.
In this tip I am going to cover the basics of the Group Policy editor. To access this MMC (Microsoft Management Console), from the Start menu select the Run... command. Then type "GPEDIT.MSC" and press the OK button.
The policies are divided into two groups, Computer Configuration settings and User Configuration settings. The Computer configuration options change the way Windows operates. The User configuration options change the way users can interact with the operating system. Its important to note that when you modify any of these settings the changes can effect all users on your computer.
As I warned you earlier, explore these configuration options with caution. I would suggest making one change at a time then testing it, I would also note somewhere any changes that I made. Most configuration changes should take place right away, but some may require a reboot.
Monday, September 04, 2006
Windows XP: Enabling Desktop Icons
To provide a cleaner looking desktop in Windows XP, by default the desktop icons were hidden. These icons are: My Documents, My Computer, My Network Places, Internet Explorer.
To restore these desktop icons, follow the instructions below:
To restore these desktop icons, follow the instructions below:
- Right-click an empty area of the desktop and select Properties.
- Click the Desktop tab.
- Press the 'Customize Desktop' button.
- Select the icons you want to add back to your desktop.
- Press the two OK buttons to close the Desktop Properties windows.
Friday, September 01, 2006
Windows XP: Removing Fonts
Overtime as you install new programs on your computer new fonts can be installed without your knowledge. As more fonts are added, finding the right font for your documents will get harder and harder. Another result of having too many fonts installed in Windows is that it can increase the boot time of the OS.
Warning: Be careful which fonts you delete, some of these fonts are required by the OS or certain applications. By deleting certain fonts it might cause some problems, so use care.
To remove fonts from Windows, just follow the instructions below:
Warning: Be careful which fonts you delete, some of these fonts are required by the OS or certain applications. By deleting certain fonts it might cause some problems, so use care.
To remove fonts from Windows, just follow the instructions below:
- Under the Start menu, Open Control Panel folder.
- Open the Fonts folder.
- Select the font(s) you want to remove, from the Edit menu select Copy.
- Create a new folder on the desktop.
- Open new the folder and right-click an empty area in the window and select Paste. This will make a backup copy of the fonts that you're going to delete.
- Return to the Fonts folder, right-click the selected fonts and then click Delete.
Thursday, August 31, 2006
Windows XP: Disabling Devices
There are times that you may need to disable a device driver for diagnostic or performance reasons. For example, if you think a device driver is preventing your computer from working properly, you can disable it to see if it fixes the problem. Also, by disabling unused drivers you may help decrease boot time of your computer because it doesn't have to load them.
To disable a device driver, follow the instructions below:
To disable a device driver, follow the instructions below:
- From the Start menu, right-click My Computer and select Properties.
- Click the Hardware tab and press the 'Device Manager' button.
- Expand the category that contains the device that you want to disable.
- Right-click on the device and select Disable.
Wednesday, August 30, 2006
Windows XP: Professional x64 Edition
x64 Computing History in brief: First Intel created a 64-bit processor called Itanium. The processor's cost and slow adoption led AMD to create a x86-64 hybrid CPU. This was popular solution among end users, and was adopted by Microsoft in Windows XP and Vista x64 editions. Intel soon follow suit; first reluctantly, then full-bore. The newer Core 2 CPUs, including the mobile versions, are true 64-bit processors, as are AMD's Athlon 64 and Turion 64 lines.When the first x64 processors were initially released Windows could not take advantage of the extended 64-bit instructions. Then several months later Microsoft released the Windows XP Professional x64 Edition. (Note: there's very little functionality difference between Windows XP Professional 32-bit and 64-bit editions.)
The two biggest problems with transitioning to the x64 platform are two things, 32-bit application compatibility, and 64-bit driver support. When the Windows x64 edition first showed up, there was little software that could run natively in 64-bit mode, and since then more and more software has been making the transition.
Advantages of 64-Bit Processors
There are two advantages of using a 64-bit processor. One, it can handle twice as much information in the same clock cycle as a 32-bit processor. This is useful for data intensive applications (such as scientific applications, databases, etc.).
Two, these processors can also handle a lot more memory then their predecessors. For example, Windows XP x64 is currently limited to 128GB of physical memory and 16TB of virtual memory. This is an artificial limit that could be increased if Microsoft wants.
Application Compatibility
The Windows XP x64 edition was the first major processor platform transition since Windows 95. Windows 95 was the first version of Windows to fully support 32-bit applications, but it also remained backwards compatible with the older 16-bit applications. The Windows XP x64 edition is Microsoft pushing the Windows platform to the next level again.
Most 32-bit applications should be able to work with the Windows x64 edition, but there are some exceptions. Windows x64 has to use a 32-bit emulation layer to run older 32-bit applications (AKA Windows on Windows 64 or WOW64). This is because the newer 64-bit processor can only run in one of two modes 32 or 64-bit. When its in 64-bit mode, it needs to use the 32-bit emulation layer to run 32-bit software. This also means that 32-bit applications will run slower in 64-bit mode.
There are two types of applications that won't run in Windows x64, they're 16-bit and 32-bit apps running in kernel mode. There are not a lot of 16-bit applications that are still around, so this should not be an issue. Although, there is still a chance that some modern applications can still contain older 16-bit code, so you will need to test them.
Drivers Support
When Windows XP x64 edition first hit the market, there was limited hardware driver support from manufactures. Although over time that has changed, but you still need to validate that there are 64-bit versions of drivers available for the hardware that you want to use. The main thing holding back the development of these drivers is the device manufactures have been slow to update or create these drivers for their hardware.
Tuesday, August 29, 2006
Firefox: Secure Password Manager
Do you rely on Firefox's integrated password manager to remember the passwords for all the different web sites that you visit? This is a great feature, although by default its not password protected, which means that anyone using your account on your computer can then access all your secure online accounts.
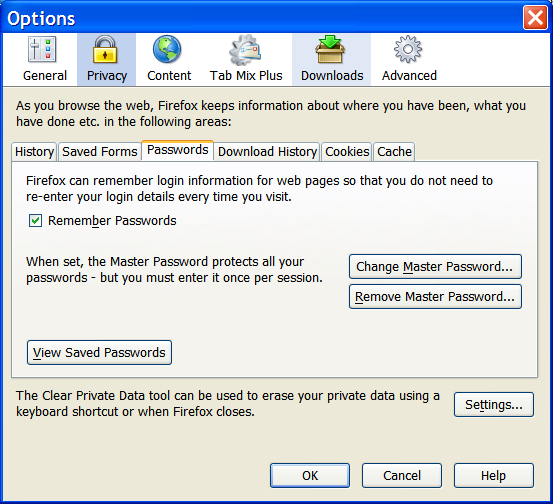
To prevent this from happening, you can set a master password so that anyone using your account in Firefox can't just use your web site passwords without knowing it. Follow the instructions below to set a master password:

To prevent this from happening, you can set a master password so that anyone using your account in Firefox can't just use your web site passwords without knowing it. Follow the instructions below to set a master password:
- Launch the Firefox browser.
- From the Tools menu, select Options...
- Click on the Privacy tab, and click on the Passwords sub-tab
- Press the 'Change Master Password' button.
- Enter a strong password (see the following article for creating a strong password)
- Press the OK button
Monday, August 28, 2006
Windows XP: Security Center Control Panel
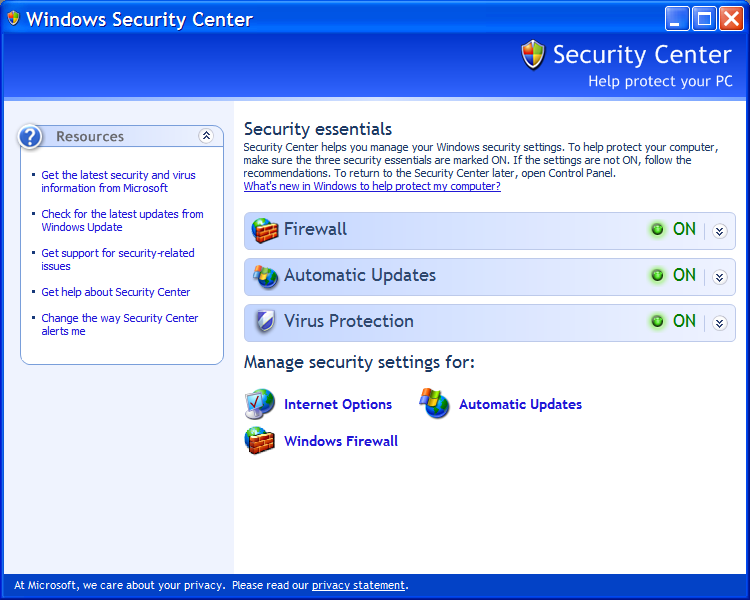
In Windows XP Service Pack 2, Microsoft introduced a great utility called the Security Center. Its a control panel that you can go to check the status of your computer's defenses. This control panel displays the status of your Firewall, automatic updates, and anti-virus protection.
If you want to quickly assess the level of your computer's protection this is the place to start. Next to each of the security services, there should be a green light icon. This indicates that the security service is operational and recognized by the Security Center. If a service has been turned off for some reason, or it can't detect the status of this service then you will be notified.
Note: Most third party firewalls and anti-virus applications have been updated to take advantage of this feature. If you're running an older version of these security services, contact the company that makes this software and check if they have any updates available to rectify this problem.
If these notifications are bothering you because one of your services is not being recognized by the Security Center, there is a way to disable this feature. In the Resources pane click the 'Change the way Security Center alerts me' link. From here you can disable or enable any of these notifications.

If you want to quickly assess the level of your computer's protection this is the place to start. Next to each of the security services, there should be a green light icon. This indicates that the security service is operational and recognized by the Security Center. If a service has been turned off for some reason, or it can't detect the status of this service then you will be notified.
Note: Most third party firewalls and anti-virus applications have been updated to take advantage of this feature. If you're running an older version of these security services, contact the company that makes this software and check if they have any updates available to rectify this problem.
If these notifications are bothering you because one of your services is not being recognized by the Security Center, there is a way to disable this feature. In the Resources pane click the 'Change the way Security Center alerts me' link. From here you can disable or enable any of these notifications.
Subscribe to:
Posts (Atom)