Wednesday, April 30, 2008

Windows Vista: Sleep Mode

I have really only briefly described Windows Vista's new Sleep mode in the past. Sleep is a hybrid low-power state, it combines the benefits of Standby and the Hibernation low-power modes.

In Windows XP, Standby mode turns off the monitor and hard drive and then your computer goes into a low power state. The advantage of this mode is that computer can resume quickly to its previous state by moving the mouse or touching the keyboard. The disadvantage to this low power state is if your computer loses power or the battery dies you loose the contents of RAM.

In Hibernation mode, the current state of RAM is saved to the hard drive, and then the computer is completely shutdown. The advantage to this mode is the current state of your computer is saved, so when you turn it back on you can resume from where you left off. Since the computer is turned off, there is no power being used. The downside is your computer will take a minute or two to return to an operational state.

In new Sleep mode, the content of RAM is saved to disk, and your computer then goes into a lower power state where on RAM and the CPU stay alive. When you press a key or move the mouse, the computer will be restored to its previous state.

If you have a notebook and the battery gets low, the machine will shut itself down automatically, to prevent loosing your data. To get it to restore itself, all you need to do is press the power button.
Note: For information on configuring this feature, please see the following article about Windows Vista Power Options.

Tuesday, April 29, 2008

Windows Vista: Power Options

Windows by default can go into hibernate or sleep when they have been inactive for a period of time. To control when your computer hibernates or goes in to sleep mode follow the instructions below:
  • From the Start menu, in the search field type power options, then click on it in the results.
From here you can select which power plan you want your computer to use (such as balanced [balances power and performance], power saver [computer runs slower, but gives you more battery life], or high performance [damn the torpedoes, full speed ahead]), customize the power plan preferences (such as how long to wait before going into that a low power mode), require a password on wake up, and a lot more.


Monday, April 28, 2008

Windows Vista: Putting Your Computer into a Low Power Mode

When you're done using your computer for the day you should turn it off, but if you need to continue where you left off you can put it into a low-power state. There are two low power modes, the first is called sleep (a new feature in Vista) and second is called hibernation.

In sleep mode the hard drive is turned off, then the the monitor and motherboard are put in a low power state. In hibernation mode, a copy of RAM is saved to the hard drive, then it and the motherboard are turned off, then the monitor is put in a low power state.

When you press the power button on your computer or notebook, this will put your computer into a sleep or hibernation state (depending on which its setup to perform).

Another way to put your computer in a sleep or hibernation state is to create a shortcut that can do the same thing as pressing the power button. Follow the instructions below to learn how to do this:
  • Right-click an empty area on your computer's desktop, and select New > Shortcut.
  • In the field type: rundll32.exe PowrProf.dll,SetSuspendState
  • Give the shortcut a descriptive name, then press the Finish button.

Wednesday, April 23, 2008

Article: 529 Computing Tips

PC Magazine reports: "For this very special feature, we'll boil down that manual's hundreds of pages into hundreds of tips—529, to be precise—carefully organized into nearly three dozen categories. This should take the hard work out of being an expert!

Crafted by our analysts and editors and tested in PC Labs, our tips compendium starts with the fundamentals of computing: the operating system and basic productivity applications such as Word and Excel. Then we touch on multimedia, mobility, and business, with hundreds of tips in each section."

Here is a cornucopia of tips from PC Magazine. The tips cover Windows, Office, Google, Browsers, and more.

Tuesday, April 22, 2008

Windows Vista: Managing Services (Part 2)

In the first part of this article I explained how to access the services installed on your system. Now I am going to discuss how to manage them.

From the Services management console you can start, stop, restart, or disable the different services on your system. When you start or stop a service, that is very obvious what it does. Although when you stop a service, it's only stopped until you reboot your computer.

When you restart a service, it stops and starts it again. When you disable a service, that prevents the service from restarting next time you reboot your computer.

You also need to be aware that some services can have dependencies, and if you stop one it can have a cascade effect and stop other related services. For example, if you opened the 'DHCP Client' service, and clicked on the Dependencies tab you would see the other services that rely on it.

Below is a brief explanation of the different tabs in the Service dialog box:
  • General: Displays the state of the service, and where the related executables are located.
  • Log On: Allows you to manage the which account the service uses to run.
  • Recovery: Allows you manage how a service will try to recover itself if it fails.
  • Dependencies: Shows you which other services dependencies on that service.

Monday, April 21, 2008

Windows Vista: Managing Services (Part 1)

All modern operating systems have several programs that run in the background. These programs are known as Services. Some of these services perform mundane tasks, while others perform critical system operations.

Unless you're performing some type of system maintenance or diagnostics, you will almost never need to worry about them. Most of the time they run quietly in the background and you won't even know that they're there.

Although, if you need to know how to access them, follow the instructions below:
Warning: If you disable any critical system services you can prevent Windows from working correctly. So make sure that you understand exactly what function a service does before you disable it. As always proceed at your own risk.
  • From the Start menu select 'Control Panels', then open the 'Administrative Tools' folder.
  • Double-click the Services icon. If you have the UAC enable it will ask you to confirm this action.
  • When the Services management console opens, you will see a list of services installed on your computer.
In the next part of this article, I discuss how to manage the different services.

Friday, April 18, 2008

Windows Vista: Turning Off Features

If you installed Windows Vista on your computer yourself, you may have noticed that you were not asked a lot of questions during the installation of the OS. Vista makes several assumptions about what it will and will not install for your computer.

It tries to install the applications and features that people will most often use. Although like anything that makes automatic assumptions for you it will never be 100% correct. If you find there is an application or functionality that you need or don't need you can add or remove it by using the 'Programs and Features' control panel.

Follow the instructions below to add or remove features from Vista:
  • Under the Start menu open the Control Panel folder, then select the 'Programs and Features'.
  • In the tasks pane on the left, click the 'Turn Windows features on or off' link.
  • Check or uncheck the features you want to install or remove. Each feature has a checkbox next to it to indicate whether its installed or not. If you want to install a feature, just check it. If you want to uninstall an existing feature uncheck it. Some items have a '+' next to it, this indicates that there are sub-features that you can enable or disable.
When you uncheck a feature, this doesn't remove that feature from your computer, it only disables it so its not consuming system resources. You can also re-enable any feature you disabled by re-checking its checkbox.

Thursday, April 17, 2008

Software: Google Earth 4.3 (Awesome Update)


Google Earth is an amazing application, but Google Earth 4.3 is awesome. Check out the following video which contains demonstrations of the new features in the program.

Wednesday, April 16, 2008

Windows Vista: Enabling/Disabling the Hibernation Feature

To turn on or off the hibernation feature in Windows Vista, you have to do it from the command line. Follow the instructions below:
  • Open the Start Menu, in the Search field type cmd then press Ctrl-Shift-Enter (this opens the administrative level command prompt).
  • In the command prompt type powercfg /hibernate on then press Enter.
  • Reboot your computer and the hibernate feature will be enabled.
Note: To turn off the hibernation feature follow the instructions above, although type powercfg /hibernate off (instead of on).

Tuesday, April 15, 2008

Review: avast! antivirus 4.8 Home Edition

PC Magazine reports: "When the version number of a new software release is just 0.1 higher than the old one, I expect a ho-hum incremental update. So I was pleasantly surprised to find that avast! antivirus 4.8 Home Edition adds significant functionality: It now protects against spyware, rootkits, and other forms of nonvirus malicious software. Best of all, it's free for personal use."

I was happy to read this review from PC Mag. about the latest version of avast, because its a free for personal use anti-malware program.

Monday, April 14, 2008

Windows XP: System Recovery (Continued)

I received a great question via email, about the last article I wrote (Windows XP: System Recovery). I was reminded that not all home computers (to be honest a good majority of them), will not ship with Windows Installation media from the factory.

These machines generally include some type of system recovery media (such as: CD or DVD), or a recovery partition on your computer's hard drive. These system recovery options (media or partition) will restore your computer to the original state when you first bought it.
Warning: Be careful when using any of the system recovery options, its designed as an option of last resort. Make sure that you have backup of all your data, and original media for your applications that didn't come with the computer. Also make sure that you have product keys or serial numbers for installing these applications.
Generally what happens when you use the system recovery option, your hard drive will be formated and the original system image from the factory will be installed. This image includes all the crapware that was originally installed when you bought your computer, and none of the latest patches or service packs

The first thing that you need to do after re-installing your operating system, is make sure your firewall is turned on. Install the latest system and application updates, then install your anti-virus and malware software. Then and only then should you install your applications, hardware drivers, other updates, or even attach your computer on the Internet.

Wednesday, April 09, 2008

Windows XP: System Recovery

There are times when Windows XP will not start properly because you have a corrupted system file, configuration, or possibly some type of driver conflict. You can easily identify this type of failure because Windows will partially start then stop during the boot-up process.

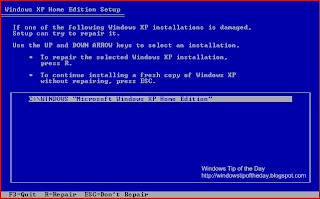
Generally at this point you have two choices, do a clean install of the OS or do a system recovery install. A system recovery install involves copying the system files back to your computer from the installation media. This type of install can replace damaged files or corrupt settings that can prevent your system from booting, while leaving your programs, configuration, and data intact.

There are two problems with this type of system repair vs. using a clean install. One, there is no guarantee it will work. Two, it doesn't remove the clutter that built up in your old system.
Warning: Whatever method you use to recover your system, there is always a danger of losing your data. You should always make sure that you have a good backup of your data before continuing. And as always proceed at your own risk.
To perform a system recovery follow the steps below:
  • Boot your computer using the Windows XP Installation CD.
  • When prompted press the Enter key to start the install of Windows XP.
  • By pressing F8 you accept the End-User License Agreement
  • The installation program will then detect your existing Windows XP installation.
  • Press R to begin the recovery process.
  • The installation program will copy all the system files to your hard drive.
  • When the installation is done copying all the files, and the setup program reboots your computer. Do not press any key when your system tries booting from the CD-ROM, let the setup process continue.


After you finish the repair process you will need to reinstall the latest service packs and any other system updates since they will have been removed by the recovery process.

Tuesday, April 08, 2008

Windows Vista: Freeing Up Disk Space After Installing SP1

Now that Windows Vista SP1 has finally been released, the following tip may come in handy if you need to free up a few hundred megabytes of disk space on your system.

SP1 includes an uninstall feature that allows you to remove the the update if you decide you don't want it. This feature works by moving all the pre-SP1 files to a temporary location on the hard drive during the install of the update. These files can consume about 800MB of storage on your drive.

If you need the disk space, and you're sure you want to keep SP1 installed on your computer. Then there is a command that you can use that will remove these files, and free up space on your hard drive. Although by removing these files, you lose the ability to uninstall SP1.

There is a special tool called the 'Windows Vista SP1 Files Removal Tool' that is automatically installed when you run the update on your system. To access this tool follow the instructions below:
  • Open a command prompt by typing "CMD" then press Ctrl-Shift-Enter in the search field under the Start menu. This will open the command prompt in an administrator mode (note: if you have the UAC enabled, you will receive a UAC prompt).
  • In the command prompt type "vsp1cln.exe"

Monday, April 07, 2008

Best FREE Windows Malicious Software Removal Tools (Updated)

These are the best free utilities for fighting malicious software (aka Malware). Malware can be defined as any software that installs itself on your computer without your permission, generally these types of programs will try to: monitor your computer activity, destroy data, steal information or steal resources (such as processor, memory, and network bandwidth) for malicious activities.

The programs listed below will help you fight against these types of malicious software by helping you to detect, remove, and prevent your system from getting infected in the first place.

Anti-Virus Scanners (Real-time)
Protects your system in real-time, which can prevent or limit the effects of an virus infection.

Anti-Virus Scanners (Standalone)
These tools can test if a system is infected, or for disinfecting it after it has been contaminated. Anti-Virus Scanners (Online)
These tools can test if a system is infected, or for disinfecting it after it has been contaminated.
Malware Scanners
Checks your system for different types of malware (spyware, keyboard loggers, trojans, etc.).
Online File Scanners
If you receive a file that you think may contain malicious code, you can upload or send it to one of the following sites below to have it scanned.
Security Tools
These programs can help protect your computer from getting infected or help you detect the existence of malicious software.
  • HijackThis (Finds malware by displaying changes to your system)
  • WinPatrol (Displays the contents of the critical areas in the registry and your hard drive)
  • ProcessExplorer (Displays processes running on your system)
  • AutoRuns (Lists programs that startup automatically)
I have tried to make this list as complete as possible, so if you feel that I am missing a great site or program that should be included in this list please feel free to e-mail me (use the 'Send Comments' link on the side to this page to e-mail me). I will include all the updates in this post as soon as I am made aware of them and verified the site.

Thursday, April 03, 2008

Intenret: Adobe Photoshop Express

I decided to check out Adobe's free Photoshop Express site (currently in beta), which is an online photo editor with two free gigabytes of storage. Personally I was not expecting too much from the site, but I came away pretty impressed. I found it to be a very simple to use photo editor, with some cool effects that will meet 80-90% of the average person's needs.


I would suggest that you take advantage of the site's Test Drive feature to see if you like the service before signing up. Photoshop Express requires a broadband connection and Adobe's Flash plug-in, and runs in most if not all modern browsers on a variety of operating systems (Windows, Mac, and Linux).

Have fun...

Wednesday, April 02, 2008

Internet: Google Docs now wtih Google Gears

Google Gears is a technology that allows you to view and edit your online documents offline, without an active internet connection. As of March 31, Google Docs (an online word processor) is rolling out with Google Gears functionality.

Initially offline access to your documents will be limited to: 1) viewing and searching your document list; 2) viewing and editing word processing documents. Currently presentations and spreadsheets can't be accessed offline as of yet. Also for now, offline access will only available in English.

For more information watch the video below.

Tuesday, April 01, 2008

Windows Vista: Creating XPS Documents

Have you ever needed to keep a copy of a certain document that you created, but didn't want to print it out. For example, if you make online purchases, you may want to make an electronic copy of the receipt of the transaction for your records.

One way to do this is use Microsoft's built-in XPS printer driver. When you print a document using this printer driver, the output will go to a local file on your computer instead of a printer. This document will look exactly like the document would if it was printed, and can be viewed or file away for future reference on your local hard drive. Another advantage to XPS is that it is an application neutral format that doesn't require the original application to be installed to use it.

To create an XPS document:
  • Open any document in just about any application and select Print.
  • In the Print dialog, choose 'Microsoft XPS Document Writer' driver then press the OK button.
  • A file dialog will display, and allow you to name the file and choose where to save it.
To view an XPS document:
  • Double-click the XPS file, and it will open in Internet Explorer.