Tuesday, August 30, 2005

Fixing Firefox Memory Leaks

Have you discovered that Firefox consumes a huge amount of memory? Open the Task Manager, and see how much memory its really using.

Some people believe this problem is caused by the Flash plug-in, but I have not been able to verify this. To solve this problem, they're suggesting that you remove this plug-in. In my humble opinion this is not an option, too many web require this plug-in in order to use it.

To help prevent this problem from happening, you can try to make a change to Firefox's configuration. This change prevents the browser's cache from getting too big.
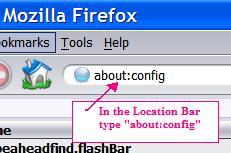
  • In the Firefox location bar, type "about:config" and press the Enter key.
  • Right-click anywhere in the browser windows, and select 'New>Integer'.
  • In the Value dialog type "browser.cache.memory.capacity", press the OK button
  • In the Value dialog, enter the maximum amount of memory you want to allow Firefox to use (i.e.: 65000), press the OK button.
  • Restart the Firefox browser.

Monday, August 29, 2005

Windows Logo Key Shortcuts

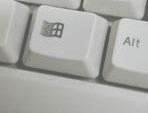
Does your keyboard have the Windows logo key (I like to call it the WinKey) on it? Did you know that you can use this key to perform specific actions quickly? For example, you can use it to display the Run... dialog, locking the screen, and more.


Below is a complete list of all the WinKey keyboard shortcuts that I am aware of:

WinKey (by itself): Opens the Start Menu.
WinKey+F1: Displays the Windows Help and Support Center.
WinKey+Pause/Break: Displays the Systems Properties control panel.
WinKey+Tab: Cycles through the application in the Taskbar. If you hold down the Shift+WinKey+Tab will reverse direction of the cycle.
WinKey+D: Minimizes all open windows and shows the Desktop. If you press the key again it will restore the windows to their previous positions.
WinKey+E: Opens a Explorer Window.
WinKey+F: Displays the file search window.
WinKey+L: Locks your computer (similar to Ctrl-Alt-Del in previous version of Window).
WinKey+M: Minimizes all open windows and shows the Desktop. The Shift+WinKey+M restores the windows to their previous positions before they were minimized.
WinKey+R: Displays the Run... command dialog.

Stopping Firefox Pop-ups

Like millions of other people, I am a big Firefox fan. I always find myself futzing with the program to make it run better, faster or become more usable. Although, over the last few months I have been noticing an increasing amount of pop-up windows being displayed.

Firefox supports pop-up window blocking, but for some reason these windows not getting blocked and they're being displayed. I am not against web sites that use pop-up windows to enhances its functionality. Although my views change when they're used for advertising. These windows are just annoying!

Well here is a tip to help prevent these pop-up windows from being displayed. It appears that some web site developers are leveraging the Flash plug-in to display these windows. Fortunately, there is a away to prevent this from happening:
  • In the Firefox location bar, type "about:config" press the Enter key.
  • Right-click on the page that is displayed, then in the context menu select 'New > Integer'.
  • In the dialog box that is displayed, type 'privacy.popups.disable_from_plugins' in the field, then press the OK button to continue.
  • Enter the value 2, then press the OK button to finish.
The possible values are:
  • 0: Allows all pop-ups from plug-ins.
  • 1: Allows pop-ups, but limits them to dom.popup_maximum.
  • 2: Blocks pop-ups from plug-ins.
  • 3: Blocks pop-ups from plug-ins (even for white listed sites).

Friday, August 26, 2005

Free Open Source Educational Programs, and Games and Simulators

Did you know about all the different types of high-quality free and open-source educational programs, games, and simulators that are available on the Internet? There are several different types of applications that are available for you to download.

The quality of these applications will vary from program to program, but most of them are really good. Here is a real short list of some of the good ones I am aware of:

Applications


  • TuxTyping - A typing tutor for children starring Tux, the Linux Penguin.
  • Tux Paint - A drawing program for young children, that provides a simple interface.
  • LeoCAD - A CAD program that uses bricks similar to those found in many toys.
  • Lincity - Build and maintain a city.

Simulators

Wednesday, August 24, 2005

Run Older Program with Windows XP

Do you have a lot of old programs, like classic games that use to run on Windows 95 but no longer run under Windows XP? There is a solution to your problem, XP has a compatibility mode that allows you to run your older software.

To access this compatibility mode you need to access the programs properties, then you can configure these settings.
  • Right-click the program icon, and select Properties.
  • Click on the Compatibility tab.
  • Check the 'Run this program in compatibility mode' checkbox.
  • From the dropdown list, select the operating system (Windows 95, 98/ME, NT (SP5), 2000) that the program ran under best.
If necessary, you can also change the display settings (i.e.: colors, resolution, visual themes), and input settings. When you're done save the setting by press the OK button.

The next time you click on the program, it will be running in Windows compatibility mode.

Note: Don't expect your older programs to run without problems while running in this mode, its not perfect emulation by any means.

Free and Open Source Games (Updated)

Tired of spending a fortune on new games, or have an older computer that can't play the most modern game. There are literally hundreds of free and open source games available on the Net. Some of them are crap, but here is list ones that are not.

Open Source Games
  • Trackballs: A marble game inspired by the 80’s Atari classic Marble Madness.
  • BZFlag (Battle Zone capture Flag): A free multi-player multi-platform 3D tank battle game.
  • glTron - Steer a light cycle, leave behind a wall.
  • Airstrike - 2D dogfighting game.
  • Enigma - Control a small black marble and have to find and identical Oxyd stones.
Strategy Games
  • Stratagus - A cross-platform real-time strategy gaming engine.
  • ASC (Advance Strategic Command) - A turn based strategy game.
  • FreeCiv - A clone of the Civilization II multiplayer strategy game.
  • TORCS - Free 3D Racing Car Simulator
  • Hexen2: Hammer of Thyrion - First person shooter game
Here is a list of classic games that are being given away for free from their manufacturer.

Free Classic Games

Monday, August 22, 2005

Google Talk

Google Talk is Google's new IM (Instant Messenger) service that is now available. The new service allows you to call or send IM messages to your friends around the world. Other features include your Gmail contacts are also automatically pre-loaded into Google Talk.

Google is committed to using open standards, that is why they support the same open protocols that other IM clients use such as Trillian, GAIM, and iChat do. For right now, if you want to talk to your friends on ICQ, Yahoo, or MSN with the new Google Talk client its not supported at this time.

Here are some resources to answer your questions about Google Talk:

Sunday, August 21, 2005

Free Anonymous Browsing Sites

There are several free sites on the Internet that allow you to protect your online privacy when visiting other web sites. The web sites are called 'anonymous proxy', which means that they act as a middleman and request the web page for you. These sites can help prevent other web sites from collecting personal information about you, such as: browser type, computer type, country, IP address, and more.

This web page is a good example of what a web site can find out about you when you visit it. This site will show where your IP address is originating. This allows web site owners and web advertisers to target advertising and track your browsing habits. Note: If you use a national ISP there is a good chance that this information will not display correctly.

If you want to see other information that web sites can find out about you, check out this web page on the Anonymizer site. It gives a good example of information that can be leaked (this is by design) by your browser.

Disclaimer: The information provided on this page comes without any warranty whatsoever. I do not recommend or endorse any of these web sites, contents, or practices. Use these sites at your own risk!

Note: Most of these web site employ some type of advertising that is displayed on the web page your visiting, or offer a fee-based premium service.
  • Anonymizer (This site is the grand-daddy of all anonymous browsing web sites. It's not a free service, but I will give it an honorable mention.)
  • The-Cloak (This site provides the most sophisticated controls, but maybe be too complex for users who don't understand the technology.)
  • Anonymouse (Provides very basic anonymous surfing, but the least intrusive interface.)
  • The VirtualBrowser (This site can block: cookies, scripts, HTTP referrer information, and more.)
  • Proxify (Provides SSL anonymous surfing. This site can block: ads, cookies, scripts, and HTTP referrer information.)
  • SurfShield.net (This site can block: cookies, scripts, and HTTP referrer information.)
  • Guardster (Provides very basic anonymous surfing)

Friday, August 19, 2005

Activate the Language Bar

Do you need to switch between different languages for your keyboard? If so, you can do this quickly by activating the language bar. Just follow the instructions below to activate this feature:
  • From the Start menu, and select 'Control Panel'.
  • Double-click the 'Regional and Language Options' control panel.
  • Click on the Languages tab.
  • Click the Details button.
  • In the Preferences section (look at the bottom of the dialog, press the 'Language Bar...' button.
  • Check the 'Show the Language Bar on the desktop'.
Note: If the 'Language Bar...' button is grayed out, click the Advanced tab and make sure the checkbox "Turn off advanced text services" is unchecked. If this box is checked, it will turn off the language bar option.

Thursday, August 18, 2005

Keyboard Shortcuts for Internet Explorer

If you use the Internet Explorer as your primary browser, here are some keyboard shortcuts that will hopefully make your life easier.
  • Alt+D: Select text in the current Address bar.
  • Alt+Home: Displays your Home page.
  • Alt+Left Arrow or Backspace: Move back a page (in the browser cache).
  • Alt+Right Arrow: Move forward a page (in the browser cache).
  • Ctrl+B: Organize Favorites.
  • Ctrl+C: Copies selected data to the clipboard.
  • Ctrl+E: Displays the Search bar.
  • Ctrl+Enter: Adds "www." to the beginning and ".com" to the end of the text in the Address bar.
  • Ctrl+F: Displays the Find dialog.
  • Ctrl+H: Displays the History bar.
  • Ctrl+I: Displays the Favorites bar.
  • Ctrl+L or Ctrl+O: Displays the open Web page, document or folder dialog.
  • Ctrl+N: Opens a new browser window.
  • Ctrl+P: Displays the Print dialog to print the active frame or current page.
  • Ctrl+R or F5: Refreshes the current page.
  • Ctrl+S: Saves the page as a file.
  • Ctrl+V: Pastes the data in the clipboard.
  • Ctrl+W: Close the current browser window.
  • Esc: Stops downloading the current page.
  • F1: Displays the Internet Explorer help window.
  • F11: Switches between full-screen and regular view mode of the browser window.
  • F4: Expands the Address bar to display all the recently entered addresses.
  • Shift+F10: Displays the context menu of a link.
  • Shift+Tab: Moves back through the Address bar, Links bar, and the items on the Web page
  • Tab: Moves through the Address bar, Links bar, and the items on the Web page

Monday, August 15, 2005

Windows Error Reporting (Part 2)

In part one we talked about WER (Windows Error Reporting), now we are going to explore other options that you have for viewing this information. This is a great trick for viewing critical errors even if you have disabled WER. Another great feature of this tool is that its a great place to quickly find and view how many types of critical errors your system has encountered.

To see this information, do the following:
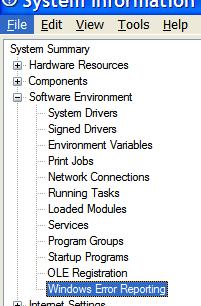
  • From the Start Menu select All Programs | Accessories | System Tools folder, then select the System Information program.
  • Expand the 'Software Environment' node, then click on 'Windows Error Reporting' (see the picture below).

Windows Error Reporting (Part 1)

When a program crashes in Windows XP, a dialog box is generally displayed asking if you want to send your crash report to Microsoft. This dialog is part of a new feature added to XP called 'Windows Error Reporting' (WER). WER can send detailed reports to Microsoft when a program crashes. Microsoft then uses this information to fix problems, they also report issues they find to vendors about errors found in their products.

In order for a program to use WER it must be specifically written to take advantage of it. Microsoft incorporates this feature in their products and they strongly encourage all developers to do the same.

Some people are worried about privacy and they have every right to be. Nobody wants any company to have more information about them, then they choose to share with that company. WER can accidentally expose private information (such as: part of a document, machine information, or possible passwords), but it doesn't do this by design. Although, if you want to know more about Microsoft's policy for handling this data, check out this Web page.

To configure WER options, do the following:
  • Open the Control Panel
  • Open the System control panel
  • Click on Advanced tab.
  • Press the 'Error Reporting' button


This opens the Error Reporting dialog, from here you can disable or enable this feature all together or only for specific applications.

Note: All reports are transmitted using HTTPS, to prevent someone other then Microsoft from receiving this information.

Friday, August 12, 2005

Help Prevent Phishing Attacks

If the idea of identity theft scares you, you're justified in your concern. It seems like everyday, new types of 'phishing attacks' are being created. If you don't know what phishing attacks are, I will try to explain.

This is when someone tries to trick you in to revealing your personal information (such as passwords, social security numbers, and more), this is known as a phishing attack. They generally do this by sending you forged emails from legitimate companies that you trust (like: B of A, Citibank, eBay, etc.). These email contain links to a phony web site that looks legitimate. Then when you go to the phony web site, it will ask you to 'verify' your information by requesting you to enter your credit card, social security numbers, user accounts and password, etc.

Unfortunately, there is no easy way to detect phishing web sites, and they're increasing in their sophistication all the time. Right now, one of the few semi-reliable tools for fighting back against these attacks, are programs that validate the IP address of the web site you're visiting.

There is a tool from a U.K. company called Netcraft, which has created a free browser plug-in called the 'Netcraft Toolbar' (now available for Internet Explorer and Firefox). Netcraft has compiled a list of known phishing sites from user input (which comes from the toolbar), and its own data.

When using the toolbar, users are encouraged to report phishing sites that they find. Then, If you attempt to visit a known phishing site, the toolbar will block it and warn you. Other web sites have 'risk ratings' assigned to them, this rating is based on technical factors in the page that may be typical of a phishing web site.
Thursday, August 11, 2005

Searching Files and Text (Classic Look)

When searching for files in Windows XP using the built-in search feature in the Windows Explorer. You might see a little animated character (generally its a dog) in the lower left corner of the window.

Some people prefer the classic look, which means searching without the animated character. If you like this feature skip this article now, if you don't like this feature read on.
  • The quickest way to access the file search window is by clicking an empty area of the taskbar and pressing F3.
  • Click the 'Change preferences' link.
  • Click the 'Without an animated screen character' link.
These steps will cause the animated character to disappear. Although, you can bring it back at anytime, just by repeating the steps above.

Tuesday, August 09, 2005

Displaying Hidden Files

Windows XP by default will automatically hide certain file types and folders to protect the operating system. For the average user who doesn't really modify their system defaults, with the exception of the changing the desktop or screen saver, this is a great feature.

If you're a power user who like to get into the nuts and bolts of the system or you just need to work on it, this feature can be really restrictive. To display hidden files and folders, do the following:

Note: By displaying hidden files, you can damage or disable the your operating system. Proceed at your own risk. It is also recommended that you have a good backup of your computer's data before making any system changes.
  • Click the My Computer icon under the Start menu.
  • Open the Tools menu, and select 'Folder Options...'.
  • Click on the View tab.
  • Scroll down the list, and select 'Show hidden files and folders' radio button. You might also want to check or uncheck the following items:
    • Check 'Display the contents of system folder' checkbox.
    • Uncheck 'Hide Extensions for known file types' checkbox.
  • Press the OK button to save your changes and exit.
You should now be able to see all of the hidden files and folders on your computer.

Burning Files and Folders to CD

Sometimes it is necessary to copy data off your computer to a removable media, like a CD or DVD. So to handle situations like this, Windows XP comes with CD burning software built in to the Windows Explorer.

A standard CD can hold about 650 Megabytes, but some newer non-standard higher-capacity CDs can hold more data (i.e.: 700MB+). I have not used this media so I can't offer any advise as far as compatibility with current and older drives.

To create a CD, follow the instructions below:
  • Insert a blank CD in to your CD recorder drive.
  • Open 'My Computer' under the Start menu.
  • Select the files or folders you want to copy to the CD (To select multiple items, hold down the CTRL key and click the files or folders you want to copy).
  • Then, under the File and Folder Tasks pane, click 'Copy this file', 'Copy this folder', or 'Copy the selected items' (the option will change depending on what items you selected).
  • In the Copy Items dialog box, find your CD recording drive click on it and then press the Copy button.
  • In My Computer, double-click the CD recording drive.
A window will open, and will show all the files and folders that will be copied to the CD when your ready to commit the files. Double check to make sure that these are all the files and folders that you want to copy. After you write these files to the CD, you can not add or delete these files. If you're using a re-writable CD you will have to reformat the CD and start over again.
  • Under 'CD Writing Tasks' pane, click the link 'Write these files to CD'.
  • The 'CD Writing Wizard' will be displayed, follow the instructions in the wizard.
Note: If you have low hard drive space you will not be able to write the files to CD. Windows makes temporary copies of all files that you're going to write to the CD on your local hard drive. You will need about a Gigabyte of free space to create a CD.

Bonus Tip:
It's useful to check the CD after you finish burning it to make sure that the files copied properly. So to help make this confirmation process easier, you should turn off the feature that automatically ejects the CD when the data transfer process is finished.

To stop the CD drive from automatically ejecting the CD:
  • Open 'My Computer' under the Start menu.
  • Right-click your CD recording drive, and then select Properties.
  • Click the Recording tab, uncheck the 'Automatically eject the CD after writing' checkbox.

Monday, August 08, 2005

Customizing Your Folders Icon and More (Part 2)

In part one we talked about customizing your folders with different icons and pictures. Now we are going to talk about different actions you can specify to happen when you open the folder. These actions primarily deal with which Explorer view will be selected when you open a folder.

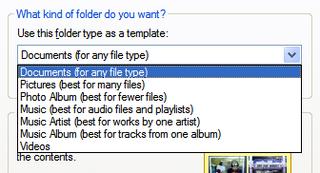
This feature is handy if you use your folders to organize different types of documents and media. For example, if you have a pictures folder you can set the Windows Explorer to open this folder to the filmstrip view automatically. All you have to do is select the 'Photo Album' option by following the instructions below:
  • Right-click on the folder that you want to customize, and select Properties.
  • Click on the Customize tab.
  • Under 'Use this folder type as a template' there is a drop down menu you can use to specify the type of documents the folder contains. Depending on the option you select, will determine which Explorer view is selected whenever that folder is opened.
  • Once you're done making all your changes, press the OK button to apply your new settings and close the dialog.

Thursday, August 04, 2005

Customizing Your Folders Icon and More (Part 1)

Windows XP allows you to customize your folders with different icons and pictures, and specify specific actions that happen when you open the folder. To customize a folder's icon or picture, you need to access the folder's properties dialog.
  • Right-click on the folder that you want to customize, and select Properties.
  • Click on the Customize tab.
  • To customize the image on the folder with a new icon or picture (note: you can only select one of the two options to customize the folder):
    • To change the icon: press the 'Change Icon...' button on the bottom of the window. You will be presented with a list of icons that you can select. Select the icon that you would like to use. If you can't find one that you like, press the Browse... button, and select a file (i.e.: .DLL, .EXE, or .ICO) that has an icon that you want.
    • To add a picture: press the 'Choose Picture...' button, a standard file selection dialog box will appear. From here you can choose the picture that you want to display on the front of the folder.
  • Press the OK buttons when done.

Wednesday, August 03, 2005

Modifying the Send To Menu

The Send To menu is a very useful context menu. This feature gives you the ability to right-click on any file and perform a specific action, such as sending a file to the desktop or another location. You can also send a file to a blank e-mail, so that it can be mailed to a friend. The options are not limitless, but they're pretty extensive.

To access the Send To menu, do the following:
  • From the Run... command (Window+R or Start menu, select Run...) type "%userprofile%\sendto" (i.e.: C:\Documents and Settings\[UserName]\SendTo) and press the Enter key.
From here you can create new folders, shortcuts to applications (such as Notepad), and more. If you create a shortcut to an application, make sure that it can handle those file types you want to send it.

If you ever want to remove some items from the Send To menu, just open up the folder and delete the shortcuts you don't want.

Tuesday, August 02, 2005

Change the Default Launch Application

Have you ever needed to change the default application used to open a file type (such as an MP3). Follow the steps below to learn how to do this:
  • Open the Windows Explorer or the My Computer icon in the Start menu.
  • From the Tools menu, select 'Folder Options...'
  • Click on the 'File Types' tab, this will display a list of all of the file extensions installed on your computer.
  • From the list select the extension (such as MP3) for which you want to change the default launch application, then press the Change... button.
  • When the 'Open With' dialog displays, select the application that you wan to use to open the selected file type. If you can't find the application, press the Browse... button and find the program that you want to use to open that file type.
  • Press the OK buttons to save your changes.

Changing the Default File Type Icon

It is pretty easy to change the default icon for any file type. The hardest part will be choosing the icon you want to use.

To change the default file type icon do the following:
  • Open the Windows Explorer or the My Computer icon in the Start menu.
  • From the Tools menu, select 'Folder Options...'
  • Click on the File Types tab, this will display a list of all of the file extensions installed on your computer.
  • From the list select the extension for which you want to change the icon, then press the Advanced button.
  • Press the 'Change Icon...' button.
  • From the new dialog that displayed, select the icon you want to use or press the Browse... button to select a file that has an icon that you want to use.
  • Press the OK buttons to save your changes.

Monday, August 01, 2005

Troubleshooting Monitor Refresh Rate Problems

Sometimes when trying to adjust the settings on your monitor like the resolution or refresh rate, you can overdrive it. If this happens, the image on the monitor will generally scroll or get really wacky. What happens is your video card is sending a signal to the monitor that it is unable to handle. So the end result is a messed up picture on the screen.

Windows comes with a safeguard to prevent this from happening. Such as a dialog that pops up asking you if you want to accept the new settings to the monitor after you change it. If you answer Yes it will save the settings, if you answer No it will revert to the previous setting (or if you don't answer the dialog in 15 seconds).

Although for some reason if your monitor gets locked into a refresh setting that it doesn't support. For example, when changing out an old monitor with a new monitor that doesn't support the older resolution settings.

There is a way to force Windows to startup in a lower resolution to correct this problem. This feature is called 'VGA mode.' When this feature is enabled, Windows will boot normally with one exception, it will use a basic VGA video driver running the monitor at 640 x 480 resolution with a 60Hz refresh rate.

To access the VGA mode option :
  • Restart your computer, and press F8 repeatedly as your computer boots
  • On the 'Windows Advanced Options Menu', select 'Enable VGA mode' and press the Enter key.
Any VGA monitor should be able to handle these settings. Then after the computer finishes booting, go into the Display control panel and make the proper adjustment to the monitor's settings.